Wednesday, March 20, 2013

Mola Inspired Art


Mola Inspired Art

Molas have their origin in body painting. Only after colonization by the Spanish and contact with missionaries did the Guna start to transfer their traditional geometric designs on fabric, first by painting directly on the fabric and later by using the technique of reverse application. It is not known for certain when this technique was first used.

As an inspiration for their designs, the Guna first used the geometrical patterns which have been used for body painting before. In the past 50 years, they also started to depict realistic and abstract designs of flowers, sea animals and birds.


http://en.wikipedia.org/wiki/Mola_(art_form)

In this textiles class we took the time to talk about the Kuna Indians, where they live and their unique artform of Molas. We looked at lots of beautiful examples of Molas and talked about how they are constructed. We noticed the bright colors and intricate designs. The students were really impressed that Kuna begin making these beautiful Molas when they are children.

 Our project was to create a Mola inspired piece out of felt. Rather than reverse applique we layered our designs and used tacky glue.

Supplies needed:

pencils
sketch paper
permanent markers
scissors
tacky glue
an assortment of colors of felt

The process:

After we got all inspired by the Kuna artists we got to work creating a simple sketch that would become our map and pattern for our felt versions. Once a sketch was decided upon we outlined it in permanent marker so that we could see it through a second piece of sketch paper in order to make the pattern pieces we needed to transfer the shapes to the felt. 

The students picked a background piece of felt and then began building their felt molas from the background forward. For instance, the student who created the turtle traced the main body of the turtle first onto paper from his "map'. Then he cut it out of paper. He used this template to trace the shape onto the felt. Next he cut it out of the felt and glued it to his background. He continued in this way through all the layers of his design.

The results were colorful and gorgeous! This was a lot of planning and hard work!


The "map" sketch in permanent ink and the beginnings of a turtle mola!


a beautiful butterfly design


Finished Mola inspired turtle by a 6 year old artist!


I love the sun reflecting in the linear water design of this one!

Adinkra Inspired Fabrics


Adinkra Inspired Fabrics


Adinkra are visual symbols, originally created by the Akan of Ghana and the Gyaman of Cote d'Ivoire in West Africa, that represent concepts or aphorismsAdinkra are used extensively in fabrics, pottery, logos and advertising. They are incorporated into walls and other architectural features. Fabric adinkra are often made by woodcut sign writing as well as screen printing.

The symbols have a decorative function but also represent objects that encapsulate evocative messages that convey traditional wisdom, aspects of life or the environment. There are many different symbols with distinct meanings, often linked with proverbs.

http://en.wikipedia.org/wiki/Adinkra_symbols


Asante boys going to a dance in adinkra robes, 1973, Accra. Color is important in adinkra garments; darker hues are reserved for funerary dress, while white or brightly colored garments are used for festive occasions.
http://angelasancartier.net/adinkra-cloth

We bagan this class by looking at Adinkra symbols and examples of Adinkra cloth. We talked about the ability of the symbols to tell a story.  We also discussed the process used to create these beautiful fabrics. 

Now that we had our inspiration we set out to 1create our own symbol, 

2make a stamp of that symbol, and 3use our stamp to create an Adinkra 

inspired cloth of our own.

Supplies needed:
pencils
paper for sketching
wooden blocks
adhesive
craft foam
fabric
acrylic paints and brushes

The Process:

I had the students begin by sketching a few ideas for symbols that they could create a stamp from. Once a symbol was chosen and simplified we transfered that image to a piece of craft foam. We cut the symbol out and adhered it to a wooden block. (I had a friend who likes to put all her store bought stamps onto acrylic blocks and had all of her wooden discards lying around! I love when things like this find a home in my studio!)

We took a moment at this point to practice printing our newly made stamps onto copy paper. This was a good way to test that our vision was being relayed but it also gave us a chance to look at one another's symbols. We agreed to share our new library of symbols and stamps in order to make more interesting designs. I love when students collaborate!

Finally, we laid out our fabric and began to stamp it with our symbols in acrylic paint. 

Check out our terrific results!

simple craft foam was used to create the stamp


some of our finish, and used, stamps


I love the experiments with color!


we used ice cream bucket lids for our stamp pads and sometimes needed the help of a brush


Thursday, March 14, 2013

Storybook Art - "Owl Moon"


"Owl Moon"

For preschool today we read the story "Owl Moon"

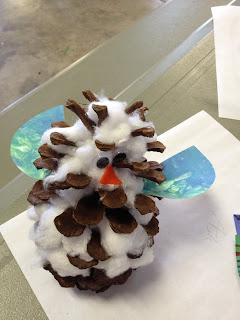
We got to work making our own owls out of pine cones!

Supplies needed:
- Pinecones
- cotton balls
- wiggle eyes
- orange felt triangles for beak
- finger painted papers for the wings

The process:
1. We had lots of fun finger painting a couple of pieces of card stock at the beginning of class so that it could start drying.
2. We took cotton balls and tore them into whispy featherlike pieces :0)
3. We filled all the nooks and crannies of our pinecone with our "feathers"
4. We added the eyes and the beak
5. At the beginning of the next class we cut a circle out of one of our painted papers and then cut the circle in half to make wings. We glued these in to complete our cute little owls!


Storybook Art - "Plenty of Pockets"


"Plenty of Pockets"

In this preschool class we read the book "Plenty of Pockets". It is a really funny story about a family that has so many things that they lose track of their son! They have a giant yard sale to get rid of their extra stuff and then add dozens of pockets to their clothes to store their most important things inside!
The illustration in this book is really unique. It is a mix of drawing and collage. As you look around the house and in the pockets you will see drawn books and tools as well as items cut and pasted in from magazines, etc. 

For our art project we made a drawing of ourselves in crayon, then added felt pockets on our clothes. Finally, we used magazine clippings to add treasures to our pockets. 

The results are very humorous!


I love how some of the treasures turned out to be hair accessories in this one!


Pocket sun glasses! This could be a whole new story line.

look at those LONG legs!


Everything you could need from a couch and washer and dryer to some juice!