Merry Christmas!
We just finished up our preschool Christmas workshop today. We had 2 one hour classes and completed FIVE projects! Here is the scoop...
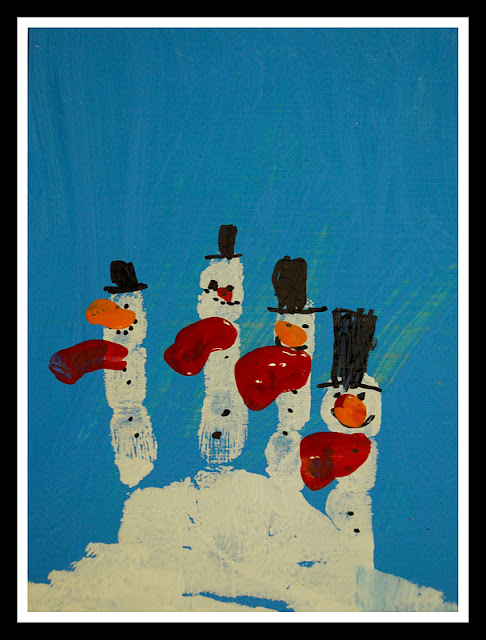
1. SNOWMAN FINGERS
I cut wood into 4x6" pieces and had the kids start by painting a blue and white background. I love that I gave them 2 shades of blue plus white paint and some mixed it all and had a solid background of blue, while others were more painterly using each color more independently on the board.

When the background was dried we painted our fingers and some of our palms white and printed them on the background.
Finally we used permanent markers and paint to detail our snowmen!
2. SANTA HAND ornaments
The kids pressed their hand prints into some salt dough and we made a hole at the top for hanging. After letting them air dry for several hours I baked them in the oven for a few more hours at about 220 degrees.
Today we painted them, creating a cute Santa face to hang on the tree
3.
SNOWMAN MAGNET CLIPS
I glued popsicle sticks to some clothes pins and had the kids paint them white. Next we added a paper hat and a felt scarf. Finally, the kids drew on faces with permanent markers. These are so cute on the fridge or on a metal door to clip all those Christmas cards up for everyone to enjoy!
4. BUBBLE PRINT Christmas Trees
Bubble printing is so much fun. Just add some tempera paint to water and dish soap. Add a straw and every kids fantasy of blowing bubbles in their milk gets to come true! Add to that that we get to capture the bubbles on paper to make prints and it really can't get any better!
As you can see all the little people had tremendous fun blowing the bubbles and printing them. We cut them into triangles and mounted them on black paper. Finally, we used red and white paint on our fingertips to paint ornaments on and then a touch of yellow at the top for the star.
Super fun, Super cute, and Super easy! *just remember not to suck in! :-)
5.
THANK YOU CARDS
One thing you definitely need at Christmas time are thank you cards for all the wonderful service and gifts friends and family offer.
For this we used blue bubble prints that we created along side our green ones. We simply cute them to size and glued them to a card stock blank card. Voila, now we are ready to be grateful.
I think another beautiful addition to these cards would be a silhouette of the Nativity. Perhaps with older children.


